Detect language automatically

|

The Detect language automatically option in Outlook and Word can automatically detect the language you are typing in and enable the proofing tools for that language. This has the same result as if you manually set the language.

Prerequisite

You must enable the languages (turn on the language-specific options) you want to use before the Detect language automatically option can detect the language you are typing in and enable the proofing tools for that language.

Step which is used in Outlook 2007

  1. Open a new e-mail message.
  2. On the Message tab, in the Proofing group, click the arrow under Spelling.
  3. Click Set Language.
  4. Select the Detect language automatically check box.
  5. Review the languages shown above the double line in the Mark selected text as list. Outlook can only detect those languages listed above the double line. If there are languages you use that are not shown above the double line, you must enable those languages (turn on the language-specific options) to have Outlook automatically detect them.

Note Automatic language detection does not work on a single-word basis but on a sentence basis. Depending on the length of your sentences, you might need to type several sentences before Outlook has enough contextual information to automatically detect the language and apply the correct dictionary.

Connection State

|

Outlook connection settings and status

Connection state determines whether Microsoft Outlook can connect with the e-mail server. You can specify that each time you start Outlook, a specific state is used — online or offline. Additionally, you can configure Outlook to automatically choose the connection state or to prompt you each time you start whether you want to work online or offline. When you use the Cached Exchange Mode feature with Microsoft Exchange Server 2003 or Microsoft Exchange Server 2007, you can control how much and the type of data sent through the connection.

Connection state

The connection state determines whether Outlook is online or offline. When Outlook is offline you can only work with items stored on your computer. How Outlook synchronizes folders when you are offline is determined by Send/Receive groups. You can specify that Outlook either automatically detect the connection state or prompt you so you can manually choose each time you start Outlook.

Keyboard shortcut To open the Send/Receive Groups dialog box, press Ctrl+Alt+S.

The connection state is displayed on the status bar.

· Microsoft Exchange

Connection state

Description

Online

You are working with your Exchange mailbox. Full items, including attachments are available to you.

Trying to connect

One or more of the connections to a server is not active. Outlook is continuously trying to reestablish the connection. You can continue to work with your information, and once Outlook is able to connect to Exchange, changes will be synchronized automatically.

Disconnected

One or more of the connections to a server is not active. Outlook was not able to restore a connection to Exchange for at least five minutes. Outlook will retry every 15 minutes to connect. To override the delay, and try immediately, on the File menu, click Connect to Exchange account.

Offline

You have chosen to work offline. No connection attempts are made to Exchange, unless you initiate them. Folder synchronization and updates to the Address Book while offline are controlled by Send/Receive group settings or Remote Mail. If Outlook switched to an offline state automatically, you will be returned to an online state when a connection is available. If you manually selected an offline state, you must exit and restart Outlook to change connection states.

Note If you deliver e-mail messages to a Personal Folders file (.pst), these connection states do not apply and are not shown in the status bar.


source microsoft.office.com

Outlook Text Massage


Create and send a text message

Text messaging can often be the quickest and most convenient way to contact someone who is on the move. Outlook Mobile Service makes it easy to create and send text messages to mobile devices from your computer. To send text messages, you must first add and configure an Outlook Mobile Service account.

Create a new text message

· On the File menu, click New, and then click Text Message.

· Enter the recipient's e-mail address or mobile phone number in the To box. To search for a recipient in an address book, click the To button.

· Type your message in the message body.

· If you want, you can insert emoticons in your message. On the Text Message tab, in the Insert group, click Emoticon String, and then click an emoticon that you want to insert.

Specify the maximum number of text messages

Each text message has a default character limit that is specified by the mobile service provider. If you type more characters than this limit in a single text message, then the extra characters are moved automatically to a new message. You can see the total number of messages into which your original message is divided and the contents of each message in the preview pane.

· On the Text Message tab, in the Options group, enter the number that you want in the Maximum Messages box.

· For messages that are divided into more messages than this number, the extra messages are not sent and appear shaded in the preview pane

Send a text message

To send a text message that you have created, you need to specify its recipients. You can either choose recipients from one of your address books, or enter them directly into the To box of your message.

  1. Enter recipient information.

Do one of the following.

    • Choose recipients from an address book
      1. On the Text Message tab, in the Names group, click Address Book.
      2. Choose the address book that you want from the drop-down list. You can use any address book, including the Global Address List (GAL), to get your recipient's information.
      3. Select the names that you want and click the To button.

You can search for recipient information by typing a name in the Search box.

4. Click OK.

Enter recipient names directly

1. You can enter recipient information directly in the To box in one of three formats:

      1. The recipient's mobile phone number.
      2. The recipient's e-mail address
      3. The recipient's last name

If you enter the recipient's names partially, then you can use the AutoComplete feature to complete them before sending the message.

2.Click Send.

After your text message is sent successfully, it appears in the Sent Items folder with next to the subject title to indicate that it is a text message.

Note Before you can send a text message, you must have at least one valid recipient in the To, Cc, or Bcc box. In addition, the message body cannot be empty.

Use the automatic name fill-in feature (AutoComplete)

If you partially enter a recipient’s name in the To box, use the AutoComplete feature to complete the name before you send your message.

  1. On the Text Message tab, in the Names group, click Check Names. The Check Names dialog box lists possible recipient names that are close to the partial names that you entered.
  2. Select the correct recipient names, and then click OK.

If there are multiple partial names in the To box, AutoComplete lists possible names related to each partial name in turn. All addresses and mobile numbers that are valid are underlined.

Save a text message

You can save your new text message in one of three ways:

  1. Click the Save button on the Quick Access Toolbar.
  2. On the File menu, click Save.
  3. Press ALT+F, and then A.

If you close a message window that contains text or media that is not saved, you will be prompted to save your message. Click Yes to save and close the window, No to close the window without saving, or Cancel to return to the message window.

If you click Yes, your message is saved automatically to the Drafts folder. The subject of the draft message is the first 30 characters (including spaces) in the message body.

Open the draft of a text message

  1. Click the Drafts folder in the Navigation Pane. All draft text messages are indicated by next to the subject title.
  2. Double-click the message that you want to open, or select it by using the arrow keys and then press ENTER.
Click to more Microsoft Outlook Support
Virus Protection

|

By taking the following precautions, you can help reduce the risk of your computer being infected by a virus:

  1. Use the default security settings in Microsoft Office Office has safeguards in place to help protect your programs and data from viruses. We recommend that you do not change the Office default settings to less secure security settings.
  2. Turn on the security features in the Microsoft Windows Security Center, and keep your computer updated The easiest way to do this is to visit the Protect Your PC site, which guides you on how to use the Windows Security Center to enable the following:
    • Internet firewall
    • Antispyware software
    • Antivirus software

For more information about antivirus software vendors that you can sign up with, see the Microsoft Antivirus Partners site.

    • Automatic updates from Microsoft Update

Tip To locate the Windows Security Center in Microsoft Windows, do the following:

    • In Microsoft Windows Vista, click the Start button type security center in the Start Search box, and then press ENTER.
    • In Microsoft Windows XP Service Pack 2, click Start, point to All Programs, point to Accessories, point to System Tools, and then click Security Center.
  1. Try a subscription to Windows Live OneCare Windows Live One Care is a round-the-clock protection and maintenance service that you can subscribe to. Windows Live OneCare helps protect and maintain your computer by providing all-in-one functionality including virus scanning, firewall, antispyware, PC performance tuneups, and file backup and restore capability. Visit the Windows Live OneCare site for more information and to sign up for a free 90-day trial.
  2. Find out whether you really have a virus Viruses often run without your knowledge. However, if your computer is acting strangely or if one of your programs is not working correctly, this does not necessarily mean that your computer has a virus. It is important to be aware of the specific symptoms that a particular virus causes. On the Microsoft Security Antivirus Information site, you can find information and alerts about the latest viruses, their severity, and the symptoms they cause.
  3. Check the Microsoft Security Bulletins regularly An up-to-date list of security issues that affect Microsoft products is available on the Microsoft Security Updates site. This site provides technical information about security issues that affect specific products. If you don't want to remember to check the site regularly, you can subscribe to get security bulletin e-mail notifications for free that let you know about important security updates from Microsoft. In the past, hackers have attempted to mimic these notifications to send bogus information. However, it is not difficult to determine whether a Microsoft security-related message is genuine, because authentic Microsoft security bulletin notifications are always digitally signed and never include software updates as attachments. Instead, the notifications always link to the update on the Microsoft.com Web site.
  4. Download files only from trusted sites When you download a file from a Web site, be sure you know the source! You should download only files that are from known, well-established companies. When in doubt, don't download the file. As an extra precaution, you can download files onto a disk separate from your hard disk, such as a floppy disk or a zip disk, and then scan the files with your virus scanner.
  5. Install only from authentic CDs In general, installing software from authentic, commercially distributed CDs is the safest method. For example, all Microsoft CDs have holograms to prove their authenticity.
  6. Back up your data regularly If a virus erases or corrupts files on your hard disk, a recent backup may be the only way to recover your data. Back up your entire system regularly. At the minimum, back up files that you can't afford to lose, such as documents, pictures, favorite links, address books, and important e-mail messages. For details about how to back up your specific program's data, search the Microsoft Office Online Web site. You can also use the System Tools in Microsoft Windows to back up your data, as follows:
    • In Microsoft Windows Vista, click the Start button click All Programs, click Accessories, click System Tools, and then click Backup status and configuration. Follow the instructions provided.
    • In Microsoft Windows XP, click Start, point to All Programs, point to Accessories, point to System Tools, and then click Backup. Follow the instructions provided.
  7. Don't open suspicious e-mail messages or files Even though the Junk E-mail Filter in Microsoft Office Outlook helps to protect your Inbox from spam and phishing messages, it is a good idea to avoid opening any attachment in a message that you did not expect to receive, especially if the message is from a source that is unknown to you.

Source Microsoft.office.com


Calendar appointments

|

Calendar appointments and meetings

To set or remove reminders in appointments and meetings, do one of the following:

· For all new appointments or meetings that you create

    1. On the Tools menu, click Options.
    2. To have a reminder automatically turned on or off for new appointments or meetings, on the Preferences tab, in the Calendar group, select or clear the Default reminder check box.
    3. If you select the check box, enter the amount of time before the appointment or meeting when you want the reminder to appear.

· For existing appointments or meetings

    1. Open the appointment or meeting.

Note If the Open Recurring Item dialog box is displayed, you must decide whether to change the reminder for the occurrence that you opened or for the entire series. Click either Open this occurrence or Open the series, and then click OK.

    1. On the Appointment tab, in the Options group, in the Reminder list, select the amount of time before the appointment or meeting when you want he reminder to appear. To turn a reminder off, select None.

Note For all-day events, the default reminder time is 18 hours in advance. Although you can't change the default for all of the all-day events you create, you can change the reminder time individually on each appointment.

E-mail messages, Contacts, and Tasks

  1. To set or remove reminders, select the e-mail message, contact, or task.
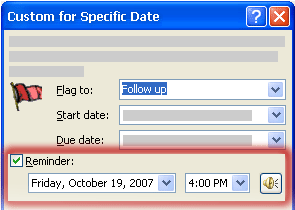
  2. On the Standard toolbar, click Button imageFollow Up, and then click Add Reminder.

Tip You can quickly flag e-mail messages as to-do items by using reminders. Right-click the Flag Status column in the message list. Or if you have the message open, on the Message tab, in the Tracking group, click Button imageFollow Up, and then click Add Reminder.

  1. In the Custom dialog box, select or clear the Reminder check box. If you select the check box, enter the date and time when you want the reminder to appear.
4. Click OK.

Create Task

|

Create a task from scratch

  1. On the File menu, point to New, and then click Task.
  2. In the Subject box, type a task (task: A personal or work-related duty or errand that you want to track through completion.) name.
  3. Complete any other boxes on the Task and Details tabs for information you want to record for the task.
  4. To make the task recur, click Recurrence, click the frequency (Daily, Weekly, Monthly, Yearly) at which you want the task to recur, and then do one of the following:

Make the task recur at regular intervals

Select options for that frequency. Do not click Regenerate new task, or the task will not recur at regular intervals.

Select options for that frequency. Do not click Regenerate new task, or the task will not recur at regular intervals.

Make the task recur based on completion date

Click Regenerate new task, and then type a time frequency in the box.

Click Regenerate new task, and then type a time frequency in the box.

  1. If you want, set start and end dates for the task.
  2. Click OK, and then click Save and Close.

Create a task from an existing task

1. In task list, select the task (task: A personal or work-related duty or errand that you want to track through completion.) you want to copy.

  • To select adjacent items (item: An item is the basic element that holds information in Outlook (similar to a file in other programs). Items include e-mail messages, appointments, contacts, tasks, journal entries, notes, posted items, and documents.), click the first item, and then hold down SHIFT and click the last item.
  • To select nonadjacent items, click the first item, and then hold down CTRL and click additional items.
  • To select all items, click the Edit menu, and then click Select All.

Note Changing the view (view: Views give you different ways to look at the same information in a folder by putting it in different arrangements and formats. There are standard views for each folder. You can also create custom views.) for items can make selecting specific items easier. For instance, if you want to select all messages that have the same subject, in the folder containing the messages, on the View menu, point to Arrange By, and then click Subject. Select the messages you want from the view.

2. On the Edit menu, click Copy. If the Copy command is not available, click the check mark in the task's Icon column, and then try again.

3. On the Edit menu, click Paste.

4. As appropriate, open the task and change its options.

source microsoft.office.com

Computer help, Computer support , computer repair , computer services. technical support

Microsoft Exchange account

|

Some features in Outlook require you to use a Microsoft Exchange account. Exchange is an e-mail-based collaborative communications server for businesses. Licenses for Exchange can be purchased from Microsoft and its resellers.

If your organization uses Exchange, but you do not know whether you have an account or how to use it, you must contact your organization's Help desk or network administrator for assistance.

Home users typically do not have an Exchange account; instead they use a POP3 e-mail account with an Internet service provider (ISP) (ISP: A business that provides access to the Internet for such things as electronic mail, chat rooms, or use of the World Wide Web. Some ISPs are multinational, offering access in many locations, while others are limited to a specific region.) or use a Web-based e-mail service, such as Windows Live Mail. If you use a POP3 (POP3: A common protocol that is used to retrieve e-mail messages from an Internet e-mail server.) e-mail account, your ISP can provide you with your specific account information. People without Exchange accounts cannot use the features in Outlook that require Exchange.

The Help for features that require an Exchange account includes one of the following notations:

  • This feature requires you to use a Microsoft Exchange account. Most home and personal accounts do not use Exchange.
  • This feature requires you to use a Microsoft Exchange account in Cached Exchange Mode. Most home and personal accounts do not use Exchange.
  • This feature requires you to use a Microsoft Exchange Server 2000, Exchange Server 2003, or Exchange Server 2007 account. Most home and personal accounts do not use Microsoft Exchange.
  • This feature requires you to use a Microsoft Exchange Server 2000, Exchange Server 2003, or Exchange Server 2007 account in Cached Exchange Mode. Most home and personal accounts do not use Microsoft Exchange.
  • This feature requires you to use a Microsoft Exchange Server 2003 or Exchange Server 2007 account. Most home and personal accounts do not use Microsoft Exchange.
  • This feature requires you to use a Microsoft Exchange Server 2003 or Exchange Server 2007 account in Cached Exchange Mode. Most home and personal accounts do not use Microsoft Exchange.
  • This feature requires you to use a Microsoft Exchange Server 2007 account. Most home and personal accounts do not use Microsoft Exchange.
  • This feature requires you to use a Microsoft Exchange Server 2007 account in Cached Exchange Mode. Most home and personal accounts do not use Microsoft Exchange.

To determine which version of Exchange your account connects to, see Determine the version of Microsoft Exchange my account connects to.

If you are not using an Exchange account, you may not see the menus, commands, or options mentioned in the Help for the features.

What types of e-mail accounts does your Outlook profile have?

You can check the Account Settings dialog box in Outlook for the types of e-mail accounts in your Outlook profile.

  1. On the Tools menu, click Account Settings.
  2. On the E-mail tab, the Type column lists the type of account for each entry. Note Some features may require specific versions of Exchange. To determine which version of Exchange your account connects to, see Determine the version of Microsoft Exchange my account connects to.

source microsoft.office.com

E-mail accounts at work

|

Exchange is designed for medium and large organizations and runs on one or more servers. You will commonly find this type of account in a medium or large organization, or in a large school environment
With an Exchange account, each user has a mailbox (mailbox: Location on a Microsoft Exchange server where your e-mail is delivered. Your administrator sets up a mailbox for each user. If you designate a personal folder file as your e-mail delivery location, messages are routed to it from your mailbox.) on the server running Exchange. When you receive a new e-mail message, it is deposited in your mailbox. Outlook enables you to view and work with your messages by connecting to Exchange.
If you use an Exchange account, typically your e-mail messages, calendar, contacts, and other items are delivered to and stored in your mailbox on the server. When you install Outlook on a new computer and add your Exchange account information, all your items on the server are available to you from this computer as well.
Exchange accounts also allow you to work offline or use Cached Exchange Mode. For this purpose, local copies of your items are kept on your computer in an Offline Folder file (.ost) (Offline Folder file:” The file on your hard disk that contains offline folders. The offline folder file has an .ost extension. You can create it automatically when you set up Outlook or when you first make a folder available offline.).” The .ost file is regularly synchronized with the items on the server running Exchange when connected. Because your data remains on the server running Exchange, you can recreate this .ost file on a new computer without having to back up the .ost file.

To determine if you are using Cached Exchange Mode, do the following:

1. On the Tools menu, click Account Settings.
The Account Settings command is on the Tools menu in Office Outlook 2007. If you are using an earlier version of Outlook, the following instructions do not apply. Use the Help that is included with that product. If the title bar of the program that you are using displays Outlook Express, then you are using a program that is not the same as Outlook. See the Help in Outlook Express for assistance.
2. On the E-mail tab, click the Exchange account, and then click Change
3. Under Microsoft Exchange Server, if the Use Cached Exchange Mode check box is selected, Cached Exchange Mode is turned on.

E-mail account types

|

POP3 Post Office Protocol 3 (POP3) is the leading e-mail account type on the Internet. With a POP3 e-mail account, your e-mail messages are downloaded to your computer and then usually deleted from the mail server. The main disadvantage of POP3 accounts is the difficulty to save and view your messages on multiple computers. Also, messages that you send from one computer are not copied to the Sent Items folder on the other computers. There are some workarounds for these issues.

IMAP With an Internet Message Access Protocol (IMAP) account, you have access to mail folders on the mail server, and you can store and process mail without downloading it to the computer that you are working on. Thus, you can use a different computer to read your messages wherever you are. IMAP can save you time because you can view the headers of your e-mail messages — who the message is from and the subject — and then choose to download only those messages that you are interested in reading. Your mail is saved on the mail server, which is usually safer, and is backed up by your mail administrator or ISP.

MAPI Messaging Application Programming Interface or MAPI is used in Outlook with a mail server that is running Exchange. MAPI is a lot like IMAP, but it provides many more features when you use it from within Outlook with an Exchange account.

HTTP These accounts use a Web protocol to view and send e-mail. HTTP accounts include Windows Live Mail. Outlook does not natively support HTTP accounts, but there are add-ins that allow you to use Outlook with certain providers. For example, Microsoft Outlook Live includes the MSN Connector for Outlook, which allows you to access your Windows Live Mail account from within Outlook.

E-mail Account

|

You can get e-mail accounts from sources such as your Internet service provider (ISP) (ISP: A business that provides access to the Internet for such things as electronic mail, chat rooms, or use of the World Wide Web. Some ISPs are multinational, offering access in many locations, while others are limited to a specific region.), your employer, or Web services such as Yahoo! Mail, Google Gmail, and Windows Live Mail. Microsoft Office Outlook does not create or issue e-mail accounts. It only provides access to your e-mail accounts (e-mail account: The server name, user name, password, and e-mail address used by Outlook to connect to an e-mail service. You create the e-mail account in Outlook by using information provided by your administrator or Internet service provider (ISP).

To send and receive e-mail messages with Microsoft Office Outlook, you need to add your e-mail account information to it. Microsoft Office Outlook 2007 supports Microsoft Exchange Server 2000, Microsoft Exchange Server 2003, Microsoft Exchange Server 2007, POP3 (POP3: A common protocol that is used to retrieve e-mail messages from an Internet e-mail server.), IMAP (IMAP (Internet Message Access Protocol): Unlike Internet e-mail protocols such as POP3, IMAP creates folders on a server to store/organize messages for retrieval by other computers. You can read message headers only and select which messages to download.), and HTTP e-mail accounts. Your Internet service provider (ISP) or mail administrator can provide you with the configuration information that you need to manually set up your e-mail account in Office Outlook 2007.

For most accounts, Office Outlook 2007 can automatically detect and configure the account with a name, e-mail address, and password. Users of Microsoft Exchange accounts might not have to type any information because Office Outlook 2007 can identify the network credentials that are used to connect to the Exchange account.

E-mail accounts are contained in profiles. An e-mail profile is comprised of e-mail accounts, data files, and settings that contain information about where your e-mail is stored. A new profile is created automatically when you run Outlook for the first time. After that, the profile runs whenever you start Outlook. Most people need only one profile. However, sometimes you might find it useful to have more than one profile. For example, you might want one profile for work e-mail messages and another profile for messages in your personal e-mail account. Also, if other people use the same computer as you, each of their accounts and settings can be kept in separate profiles with different names.

For Microsoft Outlook Express or Microsoft Windows Mail users, profiles in Outlook are similar to identities. Outlook profiles have no relation to hardware and software profiles in the Microsoft Windows operating system.Depending on your needs, you can add several e-mail accounts to a single Outlook user profile. For example, you can add an Exchange account to handle your business e-mail and then add an Internet e-mail account, such as a POP3 account from your ISP, to handle your personal e-mail. Profiles can contain all of your e-mail accounts, but there is a limit of one Exchange account per profile.

You can make changes within Outlook to e-mail accounts for the profile that you use. To change e-mail accounts in another profile, or to make changes to the properties of a profile, you must open the Mail Setup dialog box in Control Panel. The Mail module in Control Panel will not appear unless you have Outlook installed and have run Outlook at least once.

Source : microsoft.office.com